
“Arduino” is an open-source electronics platform that allows anyone to create interactive devices easily. It consists of both hardware and software components that enable users to build and program with Arduino ide customizable electronics projects.
Arduino has become popular among hobbyists, students, artists, designers and professionals due to its simplicity and ease of use.
It consists of a microcontroller motherboard and an integrated development environment (IDE) software application to write and upload program code to the physical Arduino board.
In this article, we’ll explore Arduino and how to program Arduino.
What is Arduino? – Learn Step by Step
Previously, I told you that it consists of both hardware and software components that enable users to build and program customizable electronics projects. So look at the hardware and software in detail below.
Arduino Hardware
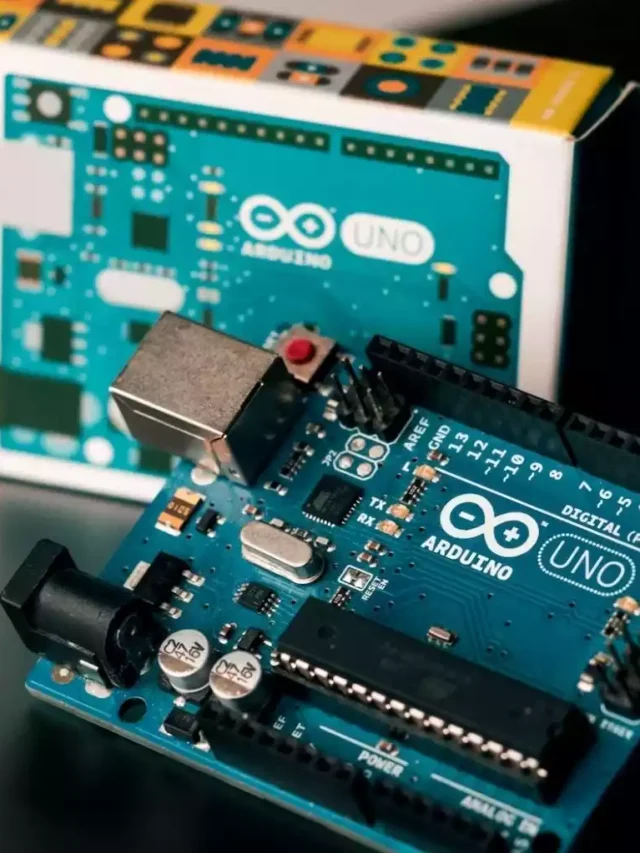
The Arduino board is the main hardware component that serves as the brain of an Arduino project. It is a small microcontroller circuit board that serves as the brain of an Arduino project. The most popular and widely used model is the Arduino Uno R3.
The most popular Arduino board is the Arduino Uno R3 which uses an Atmel 8-bit AVR microcontroller chip. The board has 14 digital input/output pins and 6 analog input pins that can interface with various kinds of electronic components and circuits.

Arduino UNO R3 in details points :
- The Arduino board is the main hardware component. The most popular version is the Arduino Uno R3.
- The board is equipped with an 8-bit Atmel AVR microcontroller chip which serves as the brain of the board. It has digital I/O pins that can be configured as input or output, analog input pins, a USB connector for programming and a power jack.
- The 14 digital I/O pins can be used to connect and control various electronic components like LEDs, motors, liquid crystal displays (LCDs), buttons etc. Out of these, 6 pins can be configured to provide PWM (pulse width modulation) output.
- 6 analog input pins can read analog voltages between 0 to 5V from sensors and convert them into digital values using analog-to-digital conversion (ADC).
- It has a 16MHz resonator, a reset button and headers for connecting to a breadboard or embedding the board into a project.
- There are many variants of Arduino boards like Arduino Mega, Nano, Leonardo etc. with different microcontrollers, number of pins and features.

What language does Arduino use?
Arduino uses a simplified version of C++, tailored for its hardware and ease of use. Here are key points about the language:
- C++ core: It’s based on C++, so you’ll use C++ syntax, variables, functions, control structures, and object-oriented concepts.
- Simplified setup: The setup for functions like input/output, timing, and communication is simplified for beginners.
- Added functions and libraries: It includes functions and libraries specifically for interacting with Arduino hardware and sensors, making it easier to control LEDs, buttons, motors, and more.
- Streamlined process: The Arduino IDE (Integrated Development Environment) handles the compilation and uploading of code to the board, simplifying the process.
Key features of Arduino’s language:
- Setup() and loop() functions: These are the core functions of any Arduino program:
setup()runs once at the beginning, used for initialization.loop()runs repeatedly after setup(), containing the main code.
- Functions for hardware interaction: Arduino provides functions like
pinMode(),digitalWrite(),analogRead(), andSerial.begin()to interact with pins, sensors, and communication. - Libraries for extended functionality: You can incorporate libraries for various components (e.g., LCD displays, motors, network modules) to expand capabilities.
Why this language is chosen:
- Hardware efficiency: C++ is efficient for low-power microcontrollers like those on Arduino boards.
- Flexibility and power: C++ offers control over hardware and the ability to create complex programs.
- Ease of learning: The simplified version makes it accessible for beginners.
- Large community and resources: Arduino’s popularity means a wealth of tutorials, libraries, and examples.
How to connect Arduino to computer?
The Uno board contains a USB connector to connect it to a computer for programming and powering the board. It also has a DC power jack so it can be powered from an external power source. There is a 16 MHz resonator for the clock, an ICSP header for in-circuit programming and a reset button. The Uno board is quite compact in size and can be integrated into final projects or prototyped on a breadboard.
There are other variants of Arduino boards like Arduino Mega, Nano, Leonardo etc. which have varying microcontroller chips, number of input/output pins and additional features to suit different project requirements. Shields are boards that can be mounted on top of Arduino boards to add capabilities like Wi-Fi, Bluetooth, GPS and so on.
Arduino Software
The Arduino Integrated Development Environment (IDE) is the software that is used to write and upload programs onto Arduino boards. The Arduino programming language is based on C/C++ and makes use of many standard C libraries and functions. The IDE provides many high-level inbuilt functions that make programming Arduino boards very simple compared to conventional microcontrollers.

Arduino IDE Compiler in details :
- The Arduino IDE is the software application used to write, compile and upload the program code to the physical Arduino board. It provides a simple interface and preset functions to allow easy programming of the board.
- Sketches refer to Arduino program code files with the .ino extension. The IDE provides standard C/C++ functions as well as Arduino-specific libraries and APIs to access all the hardware capabilities of the board through easy-to-use function calls.
- For instance, functions like pinMode(), digitalRead(), analogRead(), digitalWrite() etc. handle configuring the I/O pins, reading input pin values and setting output pin values.
- The IDE has built-in debugging features, a messages console that displays warnings, errors or logs, a text editor to write the code, menus and buttons to compile and upload sketches, and more.
How to program an Arduino?
To program an Arduino board, the code is written in the IDE usually using Arduino’s programming language. The code can include existing libraries or custom functions to access the hardware. This code is called a sketch. These sketches are saved in the file with the .ino file extension. The sketch is compiled into machine code and then uploaded to the Arduino board through a USB cable. Once programmed, the Arduino can work independently without the computer.
- You connect the Arduino board to your computer using a USB cable. This provides power to the board and also allows communication between the board and your computer.
- In the Arduino IDE on your computer, you write code in a simple programming language and save it. This code contains instructions for what you want your project to do.
- When you click upload in the IDE, it sends this code to the Arduino board over the USB cable. The microcontroller chip on the Arduino board runs this code and is able to turn your instructions into actions.
The IDE allows creating, editing and saving Arduino sketches with a text editor. It has features for cutting/pasting, auto-formatting and colour coding for easy editing. The message area displays compilation errors or provides feedback while uploading code. A toolbar at the top provides buttons for common tasks like verify (compile), upload, new file, open, save etc. The IDE makes Arduino programming very easy even for novice users.
Arduino Applications
Arduino boards can be used to develop highly interactive and complex projects as it can get input from numerous sensors, process the data and output it in various ways. Here are some example applications and projects that can be built using Arduino :

- Home automation – Control lighting, temperature, appliances, curtains, security systems etc. with Arduino by interfacing switches, sensors and electronic components.
- Internet of Things – Connect sensors and transmit sensor data to the cloud using WiFi/Ethernet shields attached to Arduino boards.
- Robotics – Arduino can operate motors, servos and any electromechanical components required in robots and interacting machines.
- Weather monitoring – Build weather stations that use sensors to record data like humidity, temperature, wind speed and upload it wirelessly.
- Student science/engineering projects – Arduino provides an accessible prototyping platform for student experiments and electronics projects.
- Wearables – Interact with mobile apps using Arduino-based wearable tech and embed Arduino into clothing.
- Smart displays – Build interactive public displays, notifications panels, menu displays with LCD/LED screens and Arduino.
- Game controllers – Create custom game pads and controllers using Arduino by integrating buttons, joysticks, sensors and more.
The simplicity of Arduino enables even novice makers and students to gain hands-on experience with interactive electronics and tackle both simple and complex projects. Ready-made Arduino kits are also available for various applications.

Arduino Community
Arduino has an active and helpful online community that provides support regarding projects, troubleshooting issues and general guidance. The official Arduino forum has thousands of members who can assist with any Arduino-related topic. There are also many tutorials, blogs, and videos created by the community that serve as great knowledge resources.
Arduino Education
Arduino is widely used in schools and colleges to teach electronics and programming. Educators use it to explain concepts in an interactive hands-on way. Arduino Education program provides training, resources and classroom kits tailored specifically for educational purposes. The Arduino Certification program offers students an opportunity to get certified in Arduino skills.
Conclusion
In conclusion, Arduino is an accessible, flexible and easy-to-use electronics prototyping platform used by hobbyists, students, artists as well as professionals. It enables rapid prototyping and creation of interactive electronics projects both simple and complex using its straightforward hardware and software components. The open-source Arduino platform has become very popular globally thanks to its simplicity, low cost and massive community support.
FAQs :
1. What is Arduino?
Arduino is an open-source electronics platform that allows you to create interactive electronics projects easily. It consists of a programmable circuit board and an integrated development environment (IDE) to write and upload code to the board.
2. What are the components of an Arduino system?
The main components are :
● Arduino Board – The microcontroller circuit board that serves as the brains. Popular boards are Uno, Mega, and Nano.
● Arduino IDE – The software to write and upload code to the board. Based on C/C++.
● Electronic Components – Sensors, motors, LEDs etc connected externally to the board.
● Power Supply – USB power or external power source like battery or adapter.
3. What programming language is used with Arduino?
The Arduino IDE uses a simplified C/C++ based language. The code is called a sketch. It uses standard C functions and some Arduino-specific libraries and functions.
4. What are shields?
Ans : Shields are boards that can be stacked on top of an Arduino board to add functionalities like WiFi, Bluetooth, GPS etc. They extend the capabilities of the main board.
5. How do you upload a program to an Arduino board?
The program code written in the Arduino IDE is compiled and then uploaded to the Arduino board via the USB cable connected to the computer. This process is handled automatically by clicks in the IDE.
6. What are the main application areas of Arduino?
Arduino can be used for prototyping practically any electronics project. Common applications include home automation, IoT projects, robotics, scientific instruments, wearable technology, educational tools etc.
7. What programming skills are required for Arduino?
Basic C/C++ language skills are good to have. But the Arduino IDE is beginner-friendly and you can start with no coding experience as well. There are many tutorials and guides available online.
8. Is a separate power supply required for Arduino?
The USB cable provides power for basic needs. But for projects with many electronic components, an external power supply may be needed as USB may not be enough.
9. What are the benefits of using Arduino?
Benefits include ease of use, open source and extensible platform, inexpensive, vast online tutorials and community support.


